How to Overlay Two Images Online: Layer, Blend & Combine Photos
Want to overlay two images online but don't know where to start? You're in the right place. Whether you're looking to add a watermark, create stunning double exposure effects, or simply put one image on another online, this guide walks you through everything you need to know. No Photoshop required, no complicated software—just simple, free tools that get the job done.
📋 On This Page
- What Is Image Overlay?
- How to Overlay Two Images Online
- How to Put One Image on Another Online
- How to Overlay Images With Transparency
- How to Overlay Two Images Without Photoshop
- 7 Creative Ways to Use Image Overlays
- How to Overlay Two Images for Comparison
- PNG vs JPG for Image Overlays
- Common Image Overlay Problems & Solutions
- Tips for Better Image Overlays
- Image Overlay Use Cases for Social Media & Marketing
- Frequently Asked Questions
What Is Image Overlay?
Let's start with the basics. When people ask "what is image overlay" or "what does overlay mean in photo editing," they're really asking about a fundamental technique used in digital design and photography.
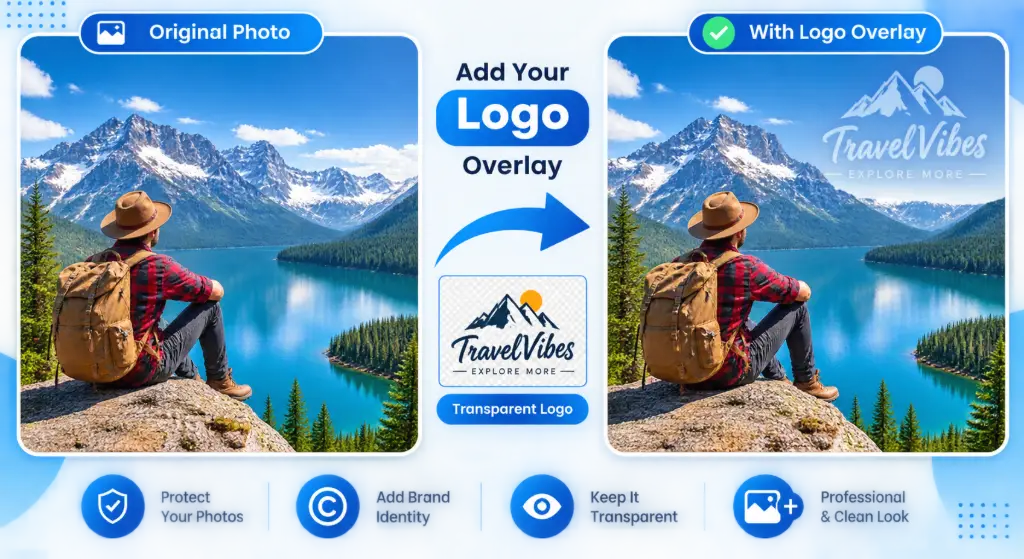
Image overlay means placing one image on top of another image, usually with controls such as position, size, opacity, or blending modes. Think of it like stacking transparent sheets—each layer can be adjusted independently while contributing to the final composition.
Image overlay meaning in simple terms: It's the process of combining two or more images where one sits on top of another, creating a layered effect. You control how much of each image shows through.
When you overlay two images online, you're essentially creating a composite where both images contribute to the final result. This technique powers everything from watermarked photos to artistic double exposures and professional marketing materials.
How to Overlay Two Images Online
Ready to actually do this? Here's your step-by-step guide to overlay two images online free using browser-based tools. No downloads, no credit card, no hassle.
The Complete Step-by-Step Process
- Upload the background image
Start by selecting your base image—the one that will sit at the bottom of the stack. This could be a product photo, landscape, portrait, or any image you want to enhance. - Upload the second image
Choose the image you want to place on top. This might be a logo, watermark, texture, or another photo you want to blend with the first. - Resize and position the overlay
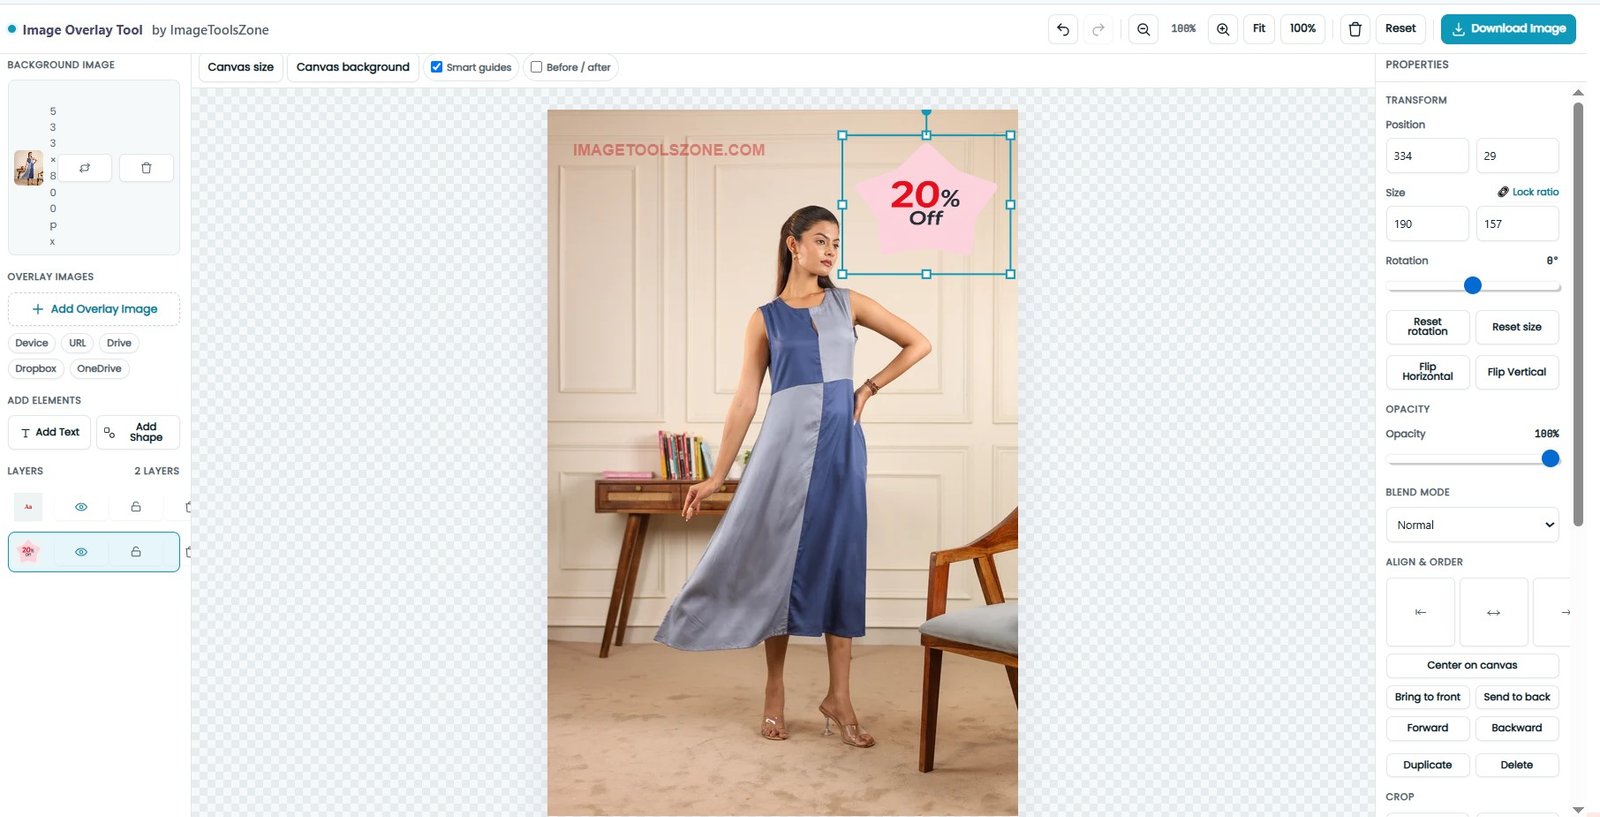
Drag, scale, and position your overlay image exactly where you want it. Most tools let you use your mouse to move the image around or enter specific X/Y coordinates for precision. - Adjust opacity
This is where the magic happens. Reduce the opacity to make the overlay semi-transparent, allowing the background to show through. Start at 100% and gradually decrease until you achieve the desired blend. - Choose a blend/effect if available
Some advanced tools offer blend modes like Multiply, Screen, Overlay, or Soft Light. These change how the colors interact between layers, creating different artistic effects. - Preview the result
Take a moment to examine your composition. Zoom in to check edges, verify alignment, and ensure the overlay looks natural and professional. - Download the final image
Once satisfied, export your creation in your preferred format (PNG for transparency, JPG for photos, etc.).
Want to overlay two images right now?
Upload Your Images and Create Your Overlay in SecondsUsing a dedicated tool like ImageToolsZone's overlay feature makes this process incredibly smooth. You can put image on image online without worrying about technical complexities or expensive software.
How to Put One Image on Another Online
People often search for "put one image on another online" or "put one picture on another online" without knowing the technical term "overlay." If that's you, don't worry—you're describing the exact same process!
When you put one image on another online, you're creating layers. The first image becomes your foundation, and the second image sits on top like a transparent sheet. You control:
- Position: Where the top image sits (center, corner, custom placement)
- Size: How large or small the overlay appears
- Transparency: How much of the bottom image shows through
- Rotation: The angle of the overlay if needed
This technique is perfect for adding logos to product photos, creating watermarks for copyright protection, or blending artistic elements together. The beauty of doing this put image on image online is that you can experiment freely—try different positions, adjust opacity levels, and see instant results without committing to permanent changes.
How to Overlay Images With Transparency
One of the most powerful features when you overlay two images online is controlling transparency. This is what separates amateur-looking overlays from professional compositions.
Understanding Opacity and Transparency
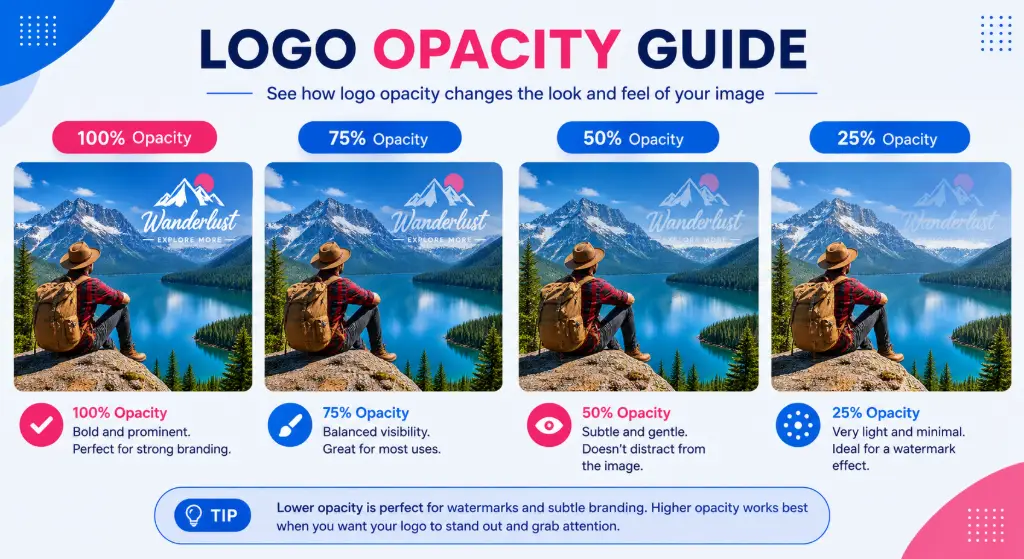
Opacity refers to how much of the underlying image remains visible through your overlay. Think of it as a sliding scale:
100% Opacity
Overlay is fully visible, completely blocks the background
75% Opacity
Slight transparency, background slightly visible
50% Opacity
Strong blending, both images equally visible
25% Opacity
Subtle overlay, background dominates
When you overlay images with transparency, you're essentially controlling how these two images interact visually. Lower opacity creates subtle effects—perfect for watermarks or textures. Higher opacity makes the overlay more prominent—ideal for logos or important graphic elements.
Working with Transparent PNGs
For the best results when you overlay PNG on image, use files with transparent backgrounds. PNG format supports transparency, meaning parts of your overlay can be invisible, allowing the background image to show through seamlessly.
For example, if you're adding a logo, a PNG with a transparent background ensures only the logo itself appears—not a white or colored box around it. This creates a professional, integrated look rather than a pasted-on appearance.
Need to remove a background first? Check out our free background remover tool to create transparent PNGs perfect for overlaying.
How to Overlay Two Images Without Photoshop
Here's the truth: you don't need expensive, complicated software to overlay two images without Photoshop. In fact, for most overlay tasks, browser-based tools are faster, easier, and completely free.
Why Choose Online Tools Over Photoshop?
- No learning curve: Photoshop takes weeks to master. Online overlay tools work intuitively from minute one.
- No installation: Everything happens in your browser. No downloads, no updates, no storage space required.
- Free access: Why pay $20/month when you can overlay two images online free with professional results?
- Quick results: Upload, adjust, download—done in under 2 minutes.
- Device flexibility: Works on Windows, Mac, Chromebook, even tablets and phones.
When you combine two images online free using tools like ImageToolsZone, you get all the essential features without the bloat. You can put a picture over another picture with full control over positioning, sizing, and transparency—everything you actually need, nothing you don't.
This image overlay without software approach is perfect for entrepreneurs, social media managers, students, and anyone who needs professional results without the professional price tag.
7 Creative Ways to Use Image Overlays
Now that you know how to overlay two images online, let's explore what you can actually create. The possibilities are endless, but these seven use cases cover what most people need:
Add a Logo
Brand your photos instantly
Add a Watermark
Protect your copyright
Double Exposure
Create artistic blends
Add Textures
Enhance visual depth
Social Graphics
Design posts & stories
Compare Images
Show before & after
Create Memes
Combine photos & text
1. Add a Logo to a Photo
One of the most common reasons to add logo to photo online is branding. Whether you're a photographer protecting your work, a business showcasing products, or an influencer maintaining brand consistency, overlaying your logo is essential.
To put logo on image effectively:
- Use a PNG with transparent background
- Position in a corner (usually bottom-right)
- Set opacity between 50-80% for subtlety
- Keep it small enough not to distract
Need to resize your logo first? Try our resize tool to get the perfect dimensions.
2. Add a Watermark
Similar to logos but often more prominent, watermarks protect your intellectual property. When you add watermark to image online, you're creating a visible claim of ownership that discourages unauthorized use.
Effective watermarking tips:
- Use semi-transparent text or logo (30-50% opacity)
- Place across the center or repeat in a pattern
- Make it visible but not destructive to the image
- Consider using your watermark tool for batch processing
3. Create Double Exposure
The double exposure effect—where two images blend together artistically—is hugely popular in modern photography and design. To create double exposure online:
- Start with a portrait or silhouette as your base
- Overlay a landscape, cityscape, or texture
- Reduce opacity to 40-60%
- Experiment with blend modes if available
- Adjust positioning until the composition feels balanced
This technique blend two photos together in a way that creates something entirely new and visually striking.

4. Blend Photos Together
Sometimes you need to blend two images online more subtly than double exposure. Maybe you're creating a composite, adding clouds to a sky, or combining elements from multiple shots.
The key is matching lighting, perspective, and color tone between your images. Use lower opacity (20-40%) for natural-looking blends, and don't be afraid to use our professional editor for fine-tuning.
5. Add Textures and Effects
Overlaying textures—like paper grain, light leaks, or film scratches—adds depth and character to digital photos. When you overlay texture on image:
- Use blending modes like Multiply or Overlay
- Adjust opacity to taste (usually 20-50%)
- Try different texture types for different moods
- Combine multiple subtle textures for complex effects
This photo overlay effects technique is popular with photographers wanting to add vintage or artistic touches to their work.
6. Create Social Media Graphics
Social media demands eye-catching visuals. When you overlay images for Instagram, Facebook, or Pinterest, you're creating content that stands out in crowded feeds.
Popular social media overlays include:
- Product photos with sale badges
- Quotes over atmospheric backgrounds
- Before/after comparisons
- Branded templates with consistent overlays
Need specific dimensions? Check our Instagram resize tool to ensure perfect formatting.
7. Compare Before and After Images
Showing transformation is powerful. Whether you're demonstrating photo editing skills, renovation progress, or fitness journeys, the ability to compare two images by overlay makes differences clear and compelling.
We'll dive deeper into this technique in the next section.
Ready to create your own overlays?
Try the ImageToolsZone Overlay Images ToolHow to Overlay Two Images for Comparison
One specialized but incredibly useful application is to overlay two images for comparison. This technique is essential for:
- Photo editing before/after showcases
- Design revision comparisons
- Product improvement demonstrations
- Medical or scientific imaging
- Quality control checks
The Comparison Method
To effectively compare two images online using overlay:
- Align the images perfectly - Use guides or grids to ensure both images line up exactly
- Set the overlay to 50% opacity - This allows you to see both images equally
- Look for differences - Areas where the images differ will be immediately visible
- Toggle visibility - Some tools let you quickly switch between layers for side-by-side comparison
This image comparison overlay technique is particularly useful when differences are subtle—like slight color corrections, minor retouching, or small positional changes that are hard to spot in traditional side-by-side comparisons.
For more advanced editing needs, our advanced photo editor offers additional comparison tools and features.
PNG vs JPG for Image Overlays
Choosing the right format matters when you overlay two images online. Let's break down PNG vs JPG overlay so you can make informed decisions.
When to Use PNG
PNG (Portable Network Graphics) is your best choice when:
- You need transparency (logos, watermarks, graphics with irregular shapes)
- You want crisp edges and sharp details
- You're overlaying text or line art
- Quality is more important than file size
The transparent PNG overlay capability is what makes PNG indispensable for professional overlays. Without transparency, you'd see ugly white or colored boxes around your overlay elements.
When to Use JPG
JPG (Joint Photographic Experts Group) works well when:
- You're overlaying photographs
- File size matters (JPGs are smaller)
- You don't need transparency
- The overlay covers the entire canvas
However, can JPG have transparency? No—JPG format doesn't support transparent pixels. Every pixel has a color value, even if it's white or black. This is why best image format for overlay is usually PNG when you need partial transparency or irregular shapes.
Pro Tip: WebP Format
Modern browsers support WebP, which offers PNG-like transparency with JPG-like compression. If your tool supports it, WebP can give you the best of both worlds. Use our format converter to experiment with different formats.
Common Image Overlay Problems & Solutions
Even when you know how to overlay two images online, things don't always go perfectly. Here are the most common issues and how to fix them:
Problem: Overlay has a white background
Solution: Your overlay image probably isn't actually transparent. Convert it to PNG format and remove the background using our background remover before overlaying.
Problem: Overlay looks blurry or pixelated
Solution: The source image resolution is too small. Always start with high-resolution images. If you must enlarge, use our image enhancer to improve quality before overlaying.
Problem: Overlay is too strong/obvious
Solution: Reduce the opacity. Start at 100% and gradually decrease until the overlay feels integrated rather than pasted on. For subtle effects, try 30-50% opacity.
Problem: Images have different dimensions
Solution: Resize or reposition the overlay. Most tools let you drag to position and use handles to resize. For precise control, use our resize tool to match dimensions before overlaying.
Problem: Overlay doesn't align correctly
Solution: Use X/Y positioning controls or enable grid/guide features. For perfect centering, look for "center align" options. Some tools offer smart alignment features.
Problem: Final image loses transparency
Solution: Choose the appropriate export format. If you need to preserve transparency in your final result, download as PNG, not JPG. JPG will fill transparent areas with white.
Problem: Colors look wrong after overlay
Solution: Check blend modes and color profiles. Try different blend modes (Normal, Multiply, Screen, Overlay) to see which preserves colors best. Use our color tools if you need to adjust tones.
Tips for Better Image Overlays
Want to take your overlays from good to great? Follow these pro tips:
1. Match Lighting and Color Temperature
When blending photos, ensure both images have similar lighting direction and color temperature. A warm sunset won't blend naturally with a cool, overcast photo.
2. Use High-Resolution Source Images
Always start with the highest quality images possible. You can always reduce quality later, but you can't add detail that wasn't there. Use our compressor after creating your overlay if file size is an issue.
3. Experiment with Opacity Levels
Don't just set it and forget it. Try multiple opacity levels—sometimes 37% looks better than 50%. Small adjustments make big differences.
4. Consider the Rule of Thirds
When positioning overlays, especially logos or focal elements, place them at intersection points of the rule-of-thirds grid for more dynamic compositions.
5. Use Appropriate Blend Modes
If your tool offers blend modes, experiment with them:
- Multiply: Darkens, great for shadows
- Screen: Lightens, perfect for light effects
- Overlay: Increases contrast
- Soft Light: Subtle contrast enhancement
6. Pay Attention to Edges
Hard edges can look artificial. If possible, use overlays with soft, feathered edges or add a slight blur to help elements blend naturally.
7. Save Your Work in Layers
If your tool supports it, save the editable version with layers intact. This lets you make adjustments later without starting over. For final delivery, flatten and export as needed.
Image Overlay Use Cases for Social Media & Marketing
Social media and marketing professionals rely heavily on overlay two images online techniques. Here's how different platforms use overlays:
Instagram Image Overlay
Instagram posts benefit from:
- Branded overlays with consistent colors and fonts
- Sale badges and promotional text
- Quote graphics over atmospheric backgrounds
- Product showcases with feature callouts
For Stories, overlays create interactive elements, countdown timers, and swipe-up indicators. Make sure to resize for Instagram specifications.
YouTube Thumbnail Overlay
YouTube thumbnails that perform well often include:
- Bold text overlays announcing video topic
- Arrows or circles highlighting key elements
- Reaction faces or emotion overlays
- Branding elements in consistent positions
Facebook Image Overlay
Facebook ads and posts use overlays for:
- Event announcements with date/time overlays
- Product comparisons (before/after)
- Testimonial quotes over relevant images
- Call-to-action buttons and graphics
Pinterest Image Overlay
Pinterest's visual nature makes it perfect for:
- Step-by-step tutorial overlays
- Recipe ingredient lists over food photos
- DIY project labels and instructions
- Inspirational quotes with beautiful backgrounds
TikTok Graphic Overlay
While TikTok is video-focused, thumbnail overlays matter for:
- Video cover images with text
- Profile grid consistency
- Promotional graphics for video series
Business Applications: Beyond social media, businesses use image overlays for product labels, sale badges, promotional banners, website graphics, email marketing headers, and advertisement creatives. The ability to quickly overlay images without Photoshop means marketing teams can produce more content, faster.
Need to add images to documents? Try our add image to PDF tool for creating professional marketing materials.
Frequently Asked Questions
To overlay two images online, upload your background image first, then upload the image you want to place on top. Use the positioning tools to move and resize the overlay, adjust the opacity to control transparency, and download your final composition. Tools like ImageToolsZone make this process simple and free.
Yes! You can overlay two images online free using browser-based tools like ImageToolsZone. No registration, no watermarks, no credit card required. Just upload, edit, and download.
Putting one image on another online is the same as overlaying. Use an online image editor, upload your base image, then add your second image as an overlay layer. Adjust position, size, and opacity until you're satisfied with the result.
Absolutely! You can overlay two images without Photoshop using free online tools. These browser-based editors offer all the essential overlay features—positioning, resizing, opacity control—without the complexity or cost of professional software.
To overlay images with transparency, use the opacity slider in your image editor. Lower the opacity percentage to make the overlay more transparent. For best results, use PNG files with transparent backgrounds so only the actual image content appears, not a colored box around it.
Yes! PNG is actually the ideal format for overlays because it supports transparency. When you overlay PNG on image, the transparent areas allow the background photo to show through, creating a seamless composite without ugly white or colored borders.
To add logo to photo online, upload your photo, then upload your logo (preferably as a PNG with transparent background). Position the logo where you want it—usually a corner—resize it appropriately, and reduce opacity to 50-80% for a professional, non-intrusive look.
Adding a watermark is similar to adding a logo. Upload your image, then add your watermark (text or logo). Position it strategically—either in a corner or repeated across the image. Set opacity to 30-50% so it's visible but doesn't ruin the photo. For batch watermarking, use our watermark tool.
Yes! To create double exposure online, start with a portrait or silhouette as your base image. Overlay a second image like a landscape or texture. Reduce opacity to 40-60% and experiment with blend modes if available. Adjust positioning until the composition feels balanced and artistic.
PNG is the best image format for overlay when you need transparency. PNG supports transparent pixels, allowing irregular shapes and logos to blend seamlessly. Use JPG only when overlaying full photographs without transparency needs, as JPG files are smaller but don't support transparency.
Yes, opacity control is a fundamental feature of overlay tools. You can adjust opacity from 0% (completely transparent) to 100% (completely opaque). Most overlays look best between 30-80% opacity, depending on your desired effect and the purpose of the overlay.
Yes! Browser-based overlay tools work on smartphones and tablets. Simply visit the tool in your mobile browser, upload images from your camera roll, and edit just like on desktop. The interface adapts to touch controls, making it easy to put image on image online from anywhere.
To overlay two images for comparison, align both images perfectly, set the overlay opacity to 50%, and examine where differences appear. This technique is excellent for spotting subtle changes in photo editing, design revisions, or quality control. Toggle visibility to see each image independently.
Your overlay image likely isn't truly transparent. JPG files always have a background color. Convert your overlay to PNG format and remove the background using a background remover tool before overlaying to eliminate the white box effect.
Yes! While this guide focuses on how to overlay two images online, most tools allow you to add multiple layers. Simply keep uploading additional images and position each one. For complex multi-image compositions, check out our merge images tool.
Ready to Create Stunning Image Overlays?
Join thousands of users who trust ImageToolsZone for professional image editing—no watermarks, no hassle, completely free.
Overlay Two Images Online Free — Start Editing NowCreate your logo overlay, watermark, double exposure or photo blend in seconds.