
Image Enhancer Free Online Tool – Improve Low-Quality Photos
Low-resolution captures, dim indoor lighting, out-of-focus optics, and digital noise can easily spoil an otherwise perfect picture. Whether you are running an online store, publishing article visual content, or organizing digital photos, an image enhancer free online tool gives you an easy way to restore soft, dull pictures into crisp graphics. Instead of battling steep learning curves or paying monthly subscription fees, online image processing brings intelligent tone and detail correction straight to your web browser.
Our online photo quality enhancer inspects digital image files to restore lost edge detail, fix exposure issues, and balance colors naturally. Below, you will learn how automated web enhancement works, how to choose the best presets for your photos, and how to build a smooth graphic workflow.
- 1. Free Image Enhancer Online – Improve Image Quality in Seconds
- 2. Enhance Images for Different Problems
- 3. Enhance Your Image Automatically
- 4. Choose the Right Image Enhancement Preset
- 5. Fine-Tune Your Photo With Powerful Image Adjustments
- 6. Compare Original vs Enhanced Image
- 7. What Can You Use an Image Enhancer For?
- 8. Image Enhancer vs Image Upscaler – What's the Difference?
- 9. Can an Image Enhancer Fix Every Blurry Photo?
- 10. How to Enhance an Image Online
- 11. Choose the Right Image Format and Quality
- 12. Who Can Use This Free Image Enhancer?
- 13. Frequently Asked Questions (FAQ)
Free Image Enhancer Online – Improve Image Quality in Seconds
Fast Browser ProcessingFixing dim or blurry pictures used to require complex desktop programs and technical photo editing skills. Today, anyone can enhance image quality online in seconds. When you need a reliable way to improve photo quality for social posts, blogs, or web projects, our browser utility produces clear, natural results without demanding account registration or software installations.
Instantly sharpen blurry or soft images by highlighting soft edges and restoring natural texture in fabrics, hair, leaves, and printed text.
Balance overall lighting to make photos clearer and more vibrant while preserving realistic skin tones and true color saturation.
Easily improve dark, dull or low-quality pictures taken under poor lighting by lifting shadow details without overexposing bright zones.
Our browser-based processing allows you to enhance images without complicated software naturally. After refining light and sharpness, you can easily pair your workflow with utilities like our convert image format without quality loss tool to prepare web graphics for publishing.
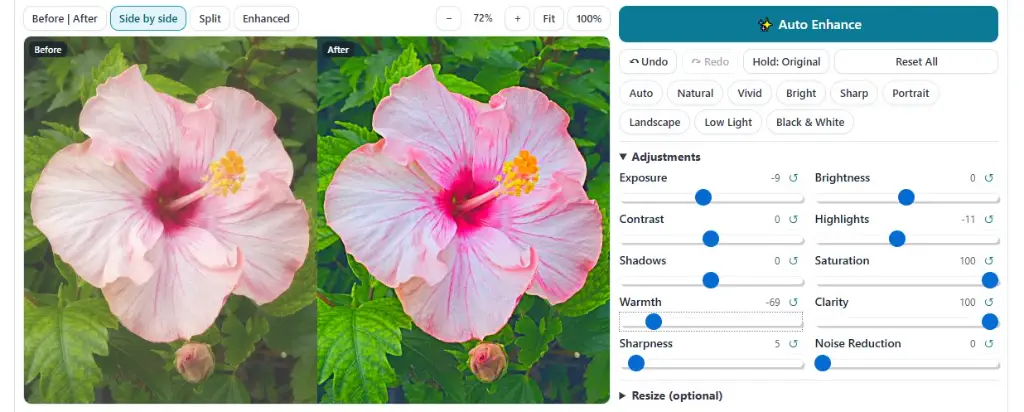
Enhance Images for Different Problems
Different image issues require specific adjustments. A photo shot in low light faces digital grain, while a handheld snapshot may suffer from focus blur. Here is how targeted processing fixes common photo defects.
When focus slips or camera movement causes soft edges, learning how to sharpen image online saves your picture. Precision edge-detection filters allow you to sharpen blurry image files, make blurry picture clear, and substantially improve image sharpness. These micro-adjustments make photo clearer naturally by sharpening structural lines. Keep in mind that while sharpening improves edge definition, extreme blur cannot reconstruct details that were never captured by the lens.
When working with heavily compressed files, learning to improve image quality online helps bring back visual clarity. Smart contrast balancing works to improve photo quality, enhance low quality image areas, and make low quality picture better across web displays. If you plan to expand graphics, combining edge contrast with methods to improve picture resolution keeps your pictures crisp.
Underexposed photos hide subtle textures inside heavy shadows. Adjusting Exposure and Brightness lifts underexposed areas into view. At the same time, targeted Highlight and Shadow controls keep bright skies clear while pulling hidden details out of dark backgrounds.
High ISO settings often create distracting digital grain. Applying modern noise reduction lets you remove noise from image layers, reduce photo noise online, and denoise image online seamlessly. This makes it easy to remove grain from photo areas and clean noisy image backgrounds. Afterwards, adjust saturation to improve photo colors, enhance photo colors, make colors more vibrant, fix dull photos, and improve image contrast effortlessly.
Need to isolate product shots after correcting exposure and color? Try our automated auto crop object for ecommerce utility or extract subjects using our free background remover tool online.
Enhance Your Image Automatically
If you need quick results, single-click automation removes the guesswork from photo editing. Follow this simple 4-step workflow:
Upload
Select any JPG, PNG, or WebP photo from your device.
Auto Enhance
Click the one click image enhancer button to analyze settings.
Compare
Check the instant before-and-after view to review your adjustments.
Download
Save your enhanced image directly without watermarks.
When you choose to auto enhance photo online, smart processing evaluates your image and applies balanced corrections across essential visual settings:
- Exposure & Brightness: Rebalances lighting across dark or overly bright zones.
- Contrast & Clarity: Expands mid-tone depth without clipping highlights or muddying shadows.
- Highlights & Shadows: Recovers dark textures while softening harsh light glares.
- Saturation & Warmth: Normalizes overall color tone for accurate, natural results.
- Sharpness & Noise: Smooths digital grain while sharpening key subject outlines.
With an automatic photo enhancer, you can automatically enhance image files in seconds, giving you an easy way to enhance photo automatically whenever time is limited.
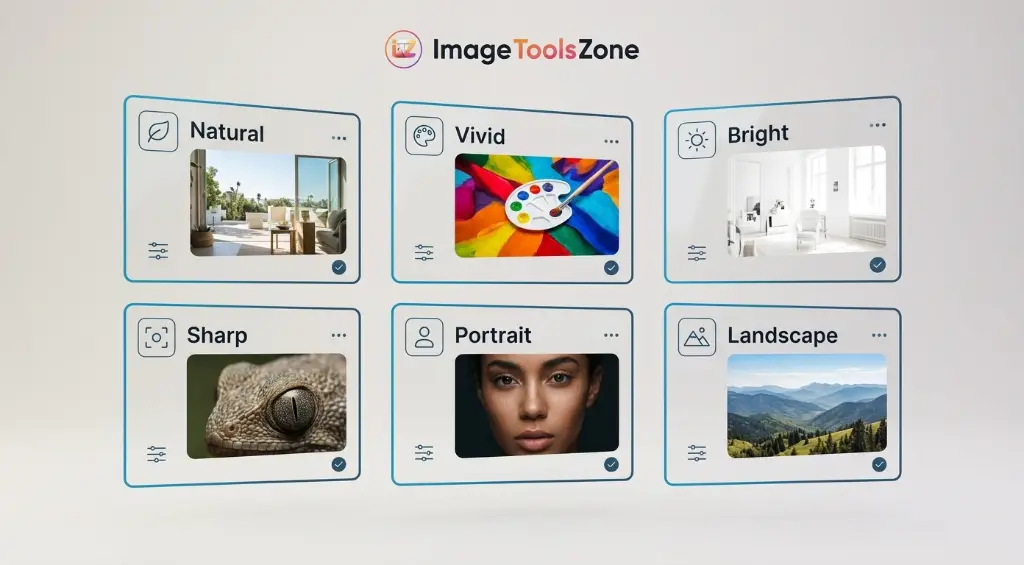
Choose the Right Image Enhancement Preset
Different types of photography require tailored editing styles. Presets offer calibrated starting points designed for specific image subjects:
Subtle, natural adjustments that keep original textures and color tones realistic.
Increases color saturation and contrast for punchy graphics that stand out on social media.
Lifts dark, shadowed, or underexposed pictures taken in poor lighting conditions.
Enhances edge definition to bring out small details in soft photos and graphics.
Smooths skin lighting while preserving natural texture, eye sharpness, and hair detail.
Deepens outdoor greens, sky blues, and distant horizon clarity in travel photos.
Reduces digital noise while brightening dark indoor and night snapshots.
Converts color pictures into rich monochrome images with controlled contrast.
Looking for creative artistic choices beyond standard corrections? Convert photos into pencil drawings using our image to sketch converter online free or create textured painting styles with our oil painting effect online free tool.
Fine-Tune Your Photo With Powerful Image Adjustments
When presets need a little extra fine-tuning, manual sliders offer complete control over your final export. Here is a guide to how each setting works:
| Adjustment | What It Does | Best Used For |
|---|---|---|
| Exposure | Controls overall light level across the canvas. | Fixing significantly dark or bright photos. |
| Brightness | Shifts overall lightness without altering total contrast range. | Making an image lighter or darker overall. |
| Contrast | Increases or decreases tonal separation between dark and light areas. | Adding depth to flat, washed-out pictures. |
| Highlights | Adjusts the brightest pixels in your image. | Recovering sky details or reflective glare. |
| Shadows | Adjusts dark pixel areas independently. | Uncovering hidden details in dark background shadows. |
| Saturation | Controls overall color intensity and richness. | Revitalizing dull or pale colors. |
| Warmth | Shifts color balance along a cool blue to warm yellow scale. | Fixing unnatural color casts from indoor lighting. |
| Clarity | Enhances mid-tone contrast to bring out surface texture. | Adding punch, structure, and detail to graphics. |
| Sharpness | Makes edges appear clearer and more defined. | Refining soft focus and bringing out fine lines. |
| Noise Reduction | Smooths out unwanted digital grain from high ISO camera settings. | Cleaning up grainy evening or low-light shots. |
Want to check original camera data like ISO or shutter speed before adjusting settings? Inspect camera details using our view image metadata tool. For full graphic manipulation, open your file directly in our advanced photo editor online free no watermark suite.
Compare Original vs Enhanced Image
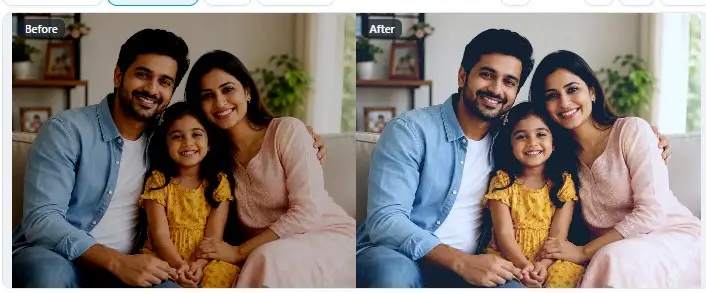
Checking your adjustments ensures your edits look natural and balanced. Using a before and after photo enhancer tool lets you inspect every change before downloading your final file.
Comparing original and enhanced versions side-by-side makes it simple to compare enhanced image details against your original shot. Testing an image enhancement before after preview helps you judge sharpness, brightness, contrast, and color balance accurately, ensuring your final image looks great on any screen.
Pro Website Design Tip
After enhancing your photo's clarity, check its alignment. Use our free rotate flip image online tool to flip or realign your graphic before publishing it online.
What Can You Use an Image Enhancer For?
Enhancing image quality offers clear benefits across many common digital projects. Here is how different users rely on web photo enhancement every day:
Clean up graphics and snapshots before posting them to Instagram, Pinterest, or Facebook feeds.
Improve product lighting, sharpen fine textures, and keep colors clear across catalog listings.
Balance facial lighting, sharpen eye clarity, and smooth skin tones on team headshots and profile pictures.
Restore contrast, sharpen faded lines, and clean up grain on digital family photo scans.
Brighten dim evening snapshots and reduce digital noise caused by low lighting.
Enrich sky tones, sharpen outdoor foliage, and clear up atmospheric haze in vacation photos.
Sharpen small typography, improve diagram contrast, and clear up screenshot blur for guides.
Polish hero banners, thumbnail graphics, and blog illustrations before placing them in web layouts.
Creating custom social media graphics? Crop your enhanced photos to ideal canvas dimensions using our resize image for instagram post utility or design video thumbnails with our instagram reel thumbnail maker tool.
Image Enhancer vs Image Upscaler – What's the Difference?
Understanding the difference between an image enhancer vs upscaler helps you choose the right tool for your project goals.
Focuses on improving visual appearance. It refines brightness, contrast, color saturation, sharpness, and noise levels without changing the file's pixel dimensions. It fixes lighting and soft focus issues while keeping the resolution identical.
Focuses on increasing pixel dimensions. It calculates and inserts new pixel data to enlarge width and height (e.g., turning a 1000x1000 photo into a 2000x2000 photo) for large-format printing or retina displays.
Knowing how to combine enhance image quality vs upscale methods lets you get the best of both: enhance sharpness and color balance first, then scale resolution to fit larger layout sizes.
Can an Image Enhancer Fix Every Blurry Photo?
While modern processing algorithms bring impressive clarity to soft images, understanding tool limits is helpful. Image enhancement improves contrast, edge sharpness, lighting balance, color depth, and visible noise. However, if a photo is severely out of focus or blurred by motion, enhancement cannot reconstruct fine details that were never captured by the camera sensor in the first place.
For moderate blur, compression artifacts, or dark lighting, online enhancement works exceptionally well. For heavily degraded images, enhancement helps clean background noise and stabilize lighting contrast.
How to Enhance an Image Online
Enhancing your photo takes just five simple steps in our online tool:
- Upload your image: Select or drag and drop your photo into the editor canvas.
- Choose Auto Enhance or a preset: Click automatic enhance or pick a preset like Natural, Vivid, Bright, Sharp, Portrait, or Low Light.
- Fine-tune the adjustments: Adjust sliders for brightness, exposure, contrast, highlights, shadows, saturation, warmth, clarity, sharpness, and noise reduction.
- Compare Before and After: Use the interactive slider view to confirm that your adjustments look natural.
- Download your enhanced image: Save your polished image file directly to your device without added watermarks.
After enhancing your image, add decorative borders using our custom photo frame generator or combine multiple pictures using our merge images online utility.
Choose the Right Image Format and Quality
Selecting the right file export format helps you maintain image clarity while managing file size:
- JPG: Best for standard photography and web graphics where smaller file sizes are important.
- PNG: Ideal for illustrations, graphics with text overlays, or images that need transparent backgrounds.
- WebP: A modern web format that delivers sharp visual clarity at much smaller file sizes than JPG or PNG.
Need a smaller file size after enhancing your photo? Use our image compressor tool to reduce file size while preserving clear visual quality, ensuring fast page load speeds across all devices.
Who Can Use This Free Image Enhancer?
Our web-based photo editor supports a wide range of creators, professionals, and everyday users:
Quickly adjust lighting, contrast, and color balance on client proofs and social posts.
Clean up product pictures to present items clearly on online storefronts.
Enhance article images, diagrams, and thumbnails to create engaging content.
Improve lighting and contrast on promotional assets before building marketing designs.
Sharpen text scans, presentation slides, and figures for educational materials.
Fix dim family pictures, travel photos, and social portraits in seconds.
Creating branded visual designs? Keep your brand colors consistent across projects using our hex color picker online free or build color schemes from enhanced photos with our image palette generator.
Frequently Asked Questions
Find quick answers to common questions about online image enhancement: