How to Resize Image for Instagram Post Without Cropping – Keep the Full Photo
📋 On This Page
Ever uploaded what you thought was the perfect photo to Instagram, only to watch in horror as the platform mercilessly chops off your subject's head or cuts out that crucial product detail? You're not alone. This frustrating experience happens to millions of users every single day.
The good news? There's a simple solution. Learning how to resize image for Instagram post properly can save your photos from Instagram's aggressive cropping algorithm and ensure your content looks exactly as you intended.
Why Wrong Image Size Is Ruining Your Instagram Posts
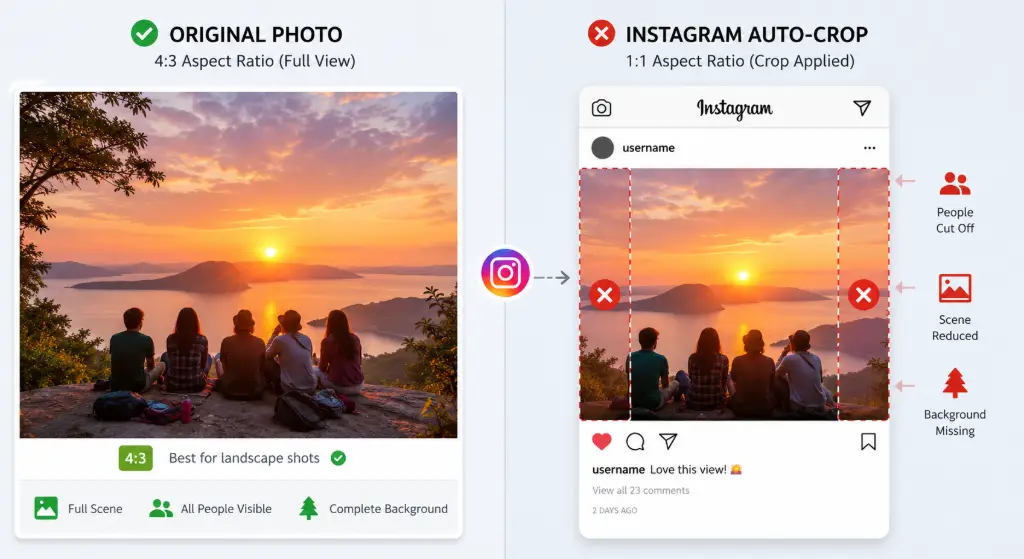
Let's talk about what's really happening when you upload a photo to Instagram. The platform isn't being malicious—it's just following strict rules about image dimensions and aspect ratios. When your image doesn't match these specifications, Instagram's algorithm takes matters into its own hands and crops it to fit.
Why Does Instagram Crop Photos?
Instagram maintains specific aspect ratios for different content types to ensure a consistent, visually appealing feed. When you upload an image that doesn't match these ratios, the platform automatically crops it to fit. This isn't random—it's mathematical precision that can work for or against you.
Here's what typically gets sacrificed:
- Faces and people - The most common casualty of bad cropping
- Product details - Essential features get cut from ecommerce photos
- Text overlays - Important captions or branding disappear
- Composition - Your carefully framed shot loses its impact
How Aspect Ratio Affects Your Final Post
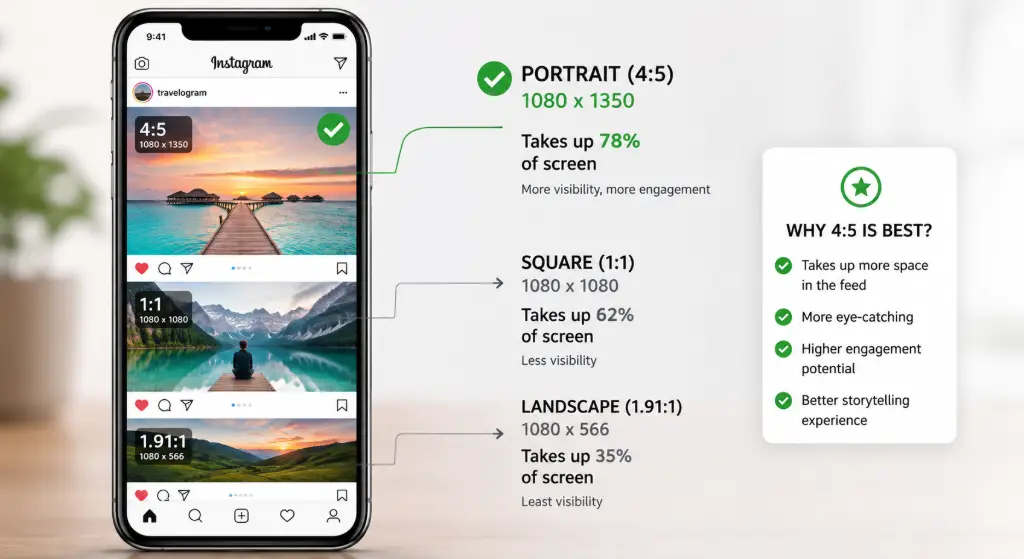
Aspect ratio is the relationship between an image's width and height. Instagram supports several ratios, but each displays differently:
Understanding these ratios is the first step to mastering Instagram's image requirements. But knowing isn't enough—you need the right tools to resize image for Instagram post dimensions accurately.
Instagram Post Size Guide + Free Image Resizer
Before we dive into the how-to, let's get crystal clear on the exact dimensions Instagram expects. Bookmark this section—you'll want to reference it every time you prepare content.
| Instagram Content | Recommended Size | Aspect Ratio |
|---|---|---|
| Square Post | 1080 × 1080 px | 1:1 |
| Portrait Post | 1080 × 1350 px | 4:5 |
| Landscape Post | 1080 × 566 px | 1.91:1 |
| Story | 1080 × 1920 px | 9:16 |
| Reel Cover | 1080 × 1920 px | 9:16 |
| Profile Photo | 320 × 320 px (min) | 1:1 |
| Carousel Images | 1080 × 1080 px | 1:1 or 4:5 |
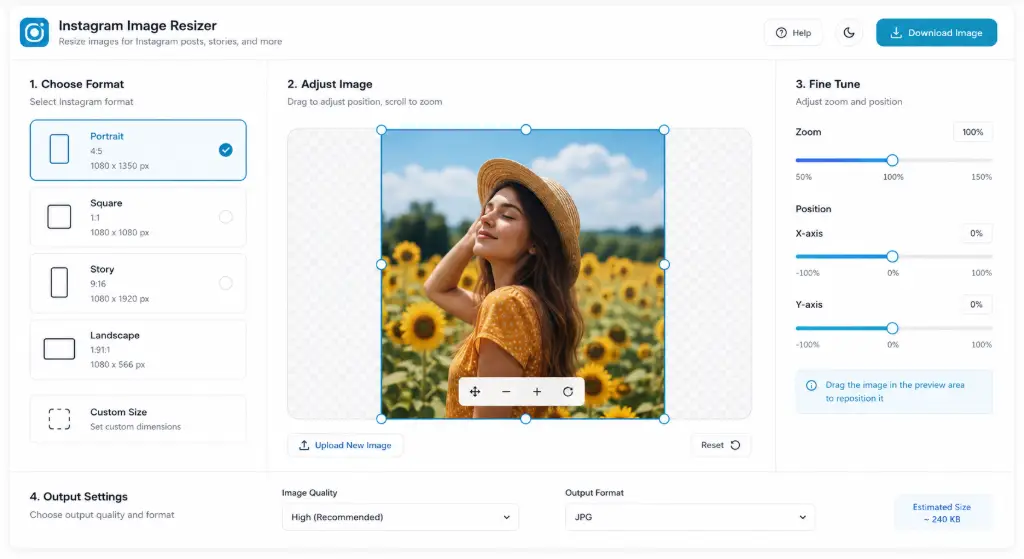
Now that you know the numbers, let's talk about actually using them. The easiest way to ensure your images match these exact dimensions is to use a dedicated Instagram photo resizer that handles the technical details for you.
How to Resize Image for Instagram Post Without Cropping
Here's where the magic happens. Resizing your image properly means you keep every pixel of your original photo while making it Instagram-ready. No cutting, no awkward cropping—just your complete image, perfectly formatted.
Resize vs. Crop: What's the Difference?
This distinction is crucial:
Resizing
Changes the dimensions of your entire image while maintaining the aspect ratio. Everything stays visible—just smaller or larger.
Cropping
Cuts away portions of your image to change the aspect ratio. Parts of your photo are permanently removed.
When you resize image for Instagram post, you want to maintain your original composition while fitting Instagram's requirements. Sometimes this means adding padding or background space rather than cutting content.
Step-by-Step: Resize Your Image for Instagram
-
Upload Your Image
Start with your original photo. Whether it's from your camera, phone, or design software, the resize photo for Instagram post tool accepts all common formats. -
Choose Your Instagram Format
Select whether you're creating a square post, portrait post, or landscape post. Each has different dimension requirements. -
Select Resize Method
Choose "Fit" to add background padding (keeps entire image visible) or "Fill" to crop to exact dimensions. For keeping your full photo, always choose "Fit." -
Maintain Aspect Ratio
Ensure the "Maintain Aspect Ratio" option is checked. This prevents distortion and keeps your image looking natural. -
Download Your Resized Image
Get your perfectly sized Instagram-ready image in seconds, ready to upload without any surprises.
How to Keep the Full Image Visible
Sometimes your image doesn't naturally fit Instagram's aspect ratios. That's okay! Here's how to handle it:
Many professional photographers and social media managers use this technique to maintain their artistic vision while playing by Instagram's rules. You can learn more about adding backgrounds in our guide to professional image editing.
Best Dimensions for Different Post Types
Portrait Posts (1080 × 1350)
Perfect for:
- Full-body fashion shots
- Vertical product photography
- Tall landscapes or architecture
- Portrait photography
Portrait posts dominate more screen real estate, making them ideal for grabbing attention in a crowded feed.
Square Posts (1080 × 1080)
Best for:
- Product flat lays
- Food photography
- Minimalist compositions
- Carousel posts (consistency)
Square is Instagram's classic format and remains popular for its clean, balanced appearance.
Landscape Posts (1080 × 566)
Ideal for:
- Wide scenic shots
- Group photos
- Before/after comparisons
- Desktop screenshots
While less common, landscape posts work well for specific content types and can make your feed stand out.
How to Resize Images Without Losing Quality
Nothing kills engagement faster than a blurry, pixelated image. You've probably experienced this: your photo looks crisp on your phone, but after uploading to Instagram, it's a blurry mess. Let's fix that.
Why Images Become Blurry After Resizing
Several factors contribute to quality loss:
️ Upscaling
Making small images larger forces the software to create pixels that don't exist, resulting in blur and artifacts.
⚠️ Compression
Repeated saving and compression degrades quality. Each edit cycle removes image data.
⚠️ Wrong Format
Using JPEG for graphics with text or PNG for photos can cause unnecessary quality issues.
⚠️ Instagram's Compression
Instagram compresses all uploads. Starting with the highest quality gives you the best end result.
Maintain Quality While Resizing
Follow these best practices to keep your images sharp:
- Start with High Resolution - Always begin with the highest quality original. If you're shooting with a camera or phone, use maximum resolution settings.
- Resize Down, Not Up - It's always better to reduce image size than enlarge it. If your image is smaller than 1080px on the shortest side, consider reshooting or redesigning.
- Use the Right Format - For photographs, JPEG at 90-100% quality works best. For graphics, logos, or images with text, use PNG to maintain sharpness.
- Avoid Multiple Edits - Edit once, resize once, then upload. Each save cycle reduces quality. Use our advanced photo editor to make all adjustments in one session.
- Export at 1080px Width - Instagram displays images at 1080px width. Exporting at this exact size prevents Instagram from resizing (and potentially degrading) your image.
Want to learn more about maintaining quality? Check out our guide on converting image formats without quality loss.
Instagram Image Sizes for Different Content Types
Instagram isn't one-size-fits-all. Different content types have different requirements. Let's break them down so you can optimize every post.
Instagram Feed Post Size
Your standard feed posts can be square, portrait, or landscape. The key is consistency within a carousel and choosing the format that best showcases your content.
Instagram Story Size (1080 × 1920)
Stories require a 9:16 aspect ratio—full vertical. This is crucial because stories disappear after 24 hours, so you want maximum impact. Use our exact size resizer to hit these dimensions perfectly.
Instagram Reel Cover Size
Reel covers also use 1080 × 1920 (9:16), but remember: the cover displays differently in your feed (cropped to 4:5) versus on your Reels tab (full 9:16). Design with both views in mind.
Instagram Carousel Image Size
Carousels let you share up to 10 images or videos. All items in a carousel should have the same aspect ratio. Mix and match will result in awkward cropping. Stick to either all square (1:1) or all portrait (4:5) for the best presentation.
Instagram Profile Picture Size
While Instagram displays profile pictures at 110 × 110px, upload at 320 × 320px minimum for clarity across all devices. Remember, it displays as a circle, so keep important elements centered.
Need to create a perfect circular profile picture? Try our circle crop tool for professional results.
How to Resize Images for Instagram on Mobile
Not everyone has access to a desktop computer, and that's perfectly fine. You can resize images for Instagram right from your phone. Here's how:
Resize Photo for Instagram on iPhone
- Open the Photos app and select your image
- Tap "Edit" then the crop/rotate icon
- Tap the aspect ratio icon (top right)
- Choose your ratio (1:1, 4:5, etc.)
- Adjust the crop框 and tap "Done"
However, the native iPhone editor only crops—it doesn't add padding. For true resizing without cropping, use a dedicated app or our mobile-friendly online resizer.
Resize Photo for Instagram on Android
- Open Google Photos or your gallery app
- Select the image and tap "Edit"
- Choose "Crop"
- Select aspect ratio from the options
- Adjust and save
Like iPhone, Android's built-in tools focus on cropping. For more control, try our advanced photo editor online which works perfectly on mobile browsers.
How to Resize Multiple Images for Instagram
If you're managing an ecommerce store, running a social media agency, or just trying to maintain a cohesive Instagram feed, resizing images one by one is a massive time drain. Batch resizing is your secret weapon.
When You Need Batch Resizing
- Ecommerce product photos - Ensure all products display consistently
- Instagram carousels - Keep all slides the same size
- Content calendars - Prepare a week's worth of posts at once
- Event photography - Standardize an entire photo shoot
- Brand consistency - Maintain uniform dimensions across all content
Batch Resizing Workflow
- Gather Your Images - Collect all images you need to resize in one folder
- Choose Your Dimensions - Decide on the target size (1080 × 1080 for square, etc.)
- Use Batch Tools - While our current tool handles one image at a time, you can speed up the process by keeping the tool open and quickly uploading/downloading
- Name Files Consistently - Use a naming convention that helps you stay organized
- Quality Check - Spot-check a few images to ensure quality is maintained
For ecommerce businesses, we also offer an auto-crop tool for ecommerce that can help standardize product photos even further.
Common Instagram Image Resizing Problems (And How to Fix Them)
Let's tackle the most frequent issues people face when preparing images for Instagram. Chances are, you've experienced at least one of these.
Instagram crops photos that don't match its supported aspect ratios (1:1, 4:5, or 1.91:1 for feed posts). The platform automatically cuts edges to fit these ratios. To prevent this, resize your image to match Instagram's exact dimensions before uploading using our Instagram resizer tool.
Blurry images usually result from: 1) Uploading images smaller than 1080px width, 2) Excessive compression, 3) Instagram's own compression algorithm. Always upload images at exactly 1080px width in high quality (JPEG 90%+ or PNG). Avoid resizing multiple times, which degrades quality.
To fit a horizontal (landscape) image without cropping, use the "Fit" or "Padding" method. This adds white or blurred bars above and below your image to create a square or portrait format while keeping the entire horizontal image visible. Our resize tool offers this option automatically.
1080 × 1350 is Instagram's portrait post size (4:5 ratio). Upload your image to our resize tool, select "Portrait" or "4:5" as your target size, ensure "Maintain Aspect Ratio" is checked, and download. The tool handles the exact dimensions automatically.
Always maintain the aspect ratio when resizing. This means the width and height scale proportionally. Never force an image into dimensions that don't match its original ratio—that causes stretching. Instead, resize to fit within your target dimensions and add padding if needed to fill the space.
Instagram applies its own compression and color processing to all uploads. Additionally, if your image doesn't match Instagram's aspect ratios, it gets cropped. To minimize differences: upload at exactly 1080px width, use sRGB color profile, save as high-quality JPEG, and match Instagram's aspect ratios precisely.
To keep your entire photo visible, use the "Fit" method instead of "Fill" or "Crop." This adds background padding (white, blurred, or colored) around your image to meet Instagram's dimensions without cutting anything out. Our Instagram resizer makes this easy with one click.
The best size depends on your content type: Portrait posts (1080 × 1350) get the most screen space and engagement. Square posts (1080 × 1080) are classic and work well for carousels. Landscape (1080 × 566) is less common but good for wide shots. For maximum impact, use portrait 4:5 ratio.
Yes, but you should resize it down to 1080px width. Instagram displays images at 1080px, so uploading 4K (3840px or higher) just wastes bandwidth and gives Instagram more data to compress. Resize to 1080px width yourself for better quality control using our exact size resizer.
Screenshots are often too large or wrong aspect ratio for Instagram. Upload your screenshot to our resizer, choose your target format (square, portrait, or landscape), and resize. If the screenshot contains text, save as PNG to maintain sharpness. You might also want to enhance the image for better clarity.
Use JPG for photographs and complex images—it creates smaller file sizes with good quality. Use PNG for graphics, logos, screenshots, or images with text, as PNG maintains sharpness better. Instagram accepts both, but converts everything to JPG eventually, so start with the highest quality possible.
All images in a carousel must have the same aspect ratio. Choose either all square (1:1) or all portrait (4:5) before you start. Resize each image to the same dimensions using our Instagram resizer. Mixing ratios causes Instagram to crop everything to match the first image.
Instagram allows images up to 30MB, but optimal file size is 1-5MB for photos. Too large files take longer to upload and get compressed more aggressively. Too small files (under 500KB) may appear low quality. Aim for 1-3MB JPEG at 90% quality for best results. Use our image compressor if needed.
Vertical photos work great for Instagram! Resize to 1080 × 1350 (4:5 portrait ratio) for maximum screen space. If your vertical photo is taller than 4:5, you can either crop it or add padding to the sides to create a square format while keeping the full vertical image visible.
Yes! The key is to resize down (not up), maintain aspect ratio, use high-quality export settings (JPEG 90%+), and avoid multiple edit cycles. Start with a high-resolution original, resize once to exactly 1080px width, and upload immediately. Our resize tool is optimized to preserve quality during resizing.
You have two options: 1) Crop the landscape image to portrait (loses side content), or 2) Add padding above and below to create a portrait frame while keeping the full landscape visible (recommended). Option 2 preserves your entire image. Use our resizer and select "Fit" mode with portrait dimensions.
Instagram will automatically crop or resize your image to fit its requirements, often cutting out important parts or reducing quality. For feed posts, it crops to fit 1:1, 4:5, or 1.91:1. For stories, it crops to 9:16. Always resize before uploading to maintain control over how your image appears.
Resize Product Images for Instagram Marketing
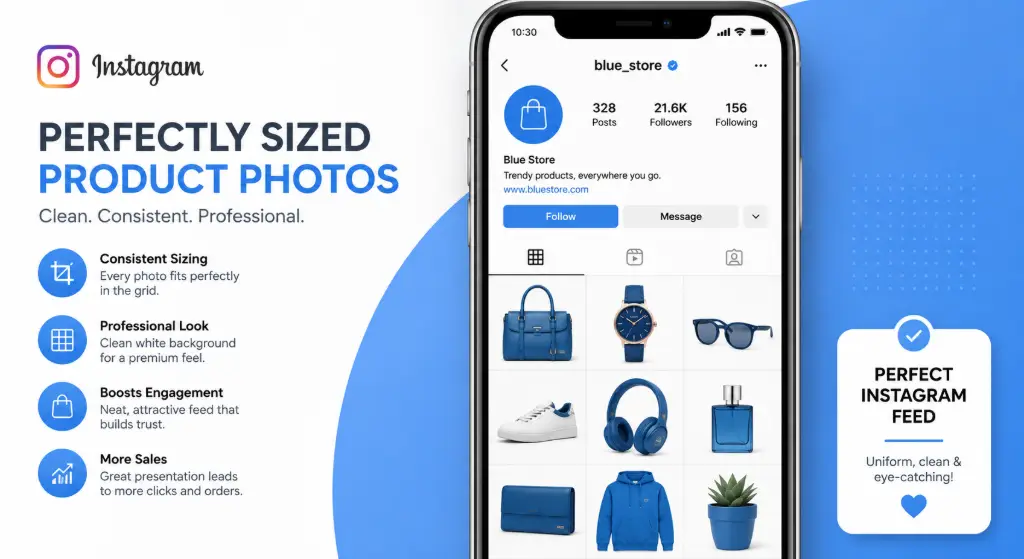
If you're selling products on Instagram, image quality and consistency aren't just nice-to-haves—they're essential for conversions. Here's how to make your product photos stand out.
Best Instagram Size for Product Photos
For ecommerce, consistency is king. Use these guidelines:
- Square (1080 × 1080) - Best for product grids and carousels
- Portrait (1080 × 1350) - Great for showing products in use or lifestyle shots
- Consistent sizing - All products should use the same dimensions
How to Make All Product Images the Same Size
- Photograph all products from similar angles and distances
- Use our auto-crop tool to remove backgrounds and standardize framing
- Resize all images to identical dimensions (1080 × 1080 recommended)
- Apply consistent editing (brightness, contrast, saturation)
- Save with the same quality settings
Avoiding Cropped Product Edges
Nothing kills a sale faster than a cropped product. Always:
- Leave breathing room around your product when shooting
- Use "Fit" mode instead of "Fill" when resizing
- Preview your image at Instagram's aspect ratio before uploading
- Test upload to a private account first
For advanced product photo editing, check out our professional image editor with no watermark.
Advanced Tips for Instagram Image Optimization
Want to take your Instagram game to the next level? These advanced techniques will set you apart from the competition.
Use Smart Cropping for Different Formats
Create one master image, then resize it for multiple Instagram formats:
- Feed post: 1080 × 1350 (portrait)
- Story: 1080 × 1920 (add padding or extend background)
- Reel cover: 1080 × 1920
This ensures brand consistency across all content types. Our exact size resizer makes this quick and easy.
Optimize for Instagram's Algorithm
Instagram favors high-quality, engaging content. Properly sized images:
- Load faster (better user experience)
- Display correctly on all devices
- Look professional (increases trust)
- Get more engagement (algorithm boost)
Create Templates for Consistency
Once you find your perfect size and style, create templates. This speeds up your workflow and maintains brand consistency. Save your resized images as templates, or use our custom frame generator for branded borders.
Batch Process for Efficiency
Set aside time each week to resize all your images at once. This is more efficient than resizing individual images as you need them. Keep a folder of Instagram-ready images so you're always prepared to post.
Conclusion: Master Instagram Image Sizing
Learning how to resize image for Instagram post without cropping is one of the most valuable skills you can develop as a content creator, marketer, or business owner. It's the difference between amateur-looking posts and professional, engaging content that stops the scroll.
Remember these key takeaways:
- Always resize to Instagram's exact dimensions before uploading
- Use 1080px width for optimal quality
- Maintain aspect ratio to prevent distortion
- Choose the right format (JPEG vs PNG) for your content
- Use "Fit" mode to keep your entire image visible
- Batch resize for efficiency when managing multiple images
Don't let Instagram's cropping ruin your carefully crafted content. Take control of your images and present them exactly as you intended.
Try our free Instagram Image Resizer now and never worry about cropped photos again!
Related Tools: Need more editing power? Check out our image compressor, background remover, and professional editor for complete image optimization.