How to Add Images to a PDF Online Free (Complete Guide 2026)
Transform your photos, screenshots, and graphics into professional PDF documents in seconds. No software installation, no watermarks, completely free.
- What Does It Mean to Add Images to a PDF?
- Why Add Images to a PDF?
- How to Add Images to a PDF Online Free
- Benefits of Creating PDFs from Images
- Supported Image Formats
- Common Mistakes to Avoid
- Best Ways to Organize Images
- How to Reduce PDF File Size
- How to Combine Multiple Photos
- How to Convert JPG, PNG, WebP
- Best Uses for Image-to-PDF
- How to Share PDFs Easily
- When to Use PDF Instead of Images
- How to Print High-Quality PDFs
- Frequently Asked Questions
Let's be honest—we've all been there. You've got a bunch of images scattered across your device: product photos for your online store, scanned documents for work, vacation snapshots you want to share, or maybe screenshots for a tutorial. And suddenly, someone asks you to send them "a PDF."
Panic sets in. Do you need expensive software? Should you download sketchy apps? Is there really a way to add images to a PDF online free without compromising quality or security?
Good news: Yes, absolutely. And it's easier than you think.
In this guide, we'll walk you through everything you need to know about converting your images into polished, professional PDFs—whether you're using a laptop, tablet, or smartphone. No technical skills required, no credit card needed, and definitely no watermarks ruining your hard work.
What Does It Mean to Add Images to a PDF?
When we talk about adding images to a PDF, we're really discussing two different scenarios that often get confused:
Creating a PDF from Images
This is when you take multiple image files (like JPGs or PNGs) and combine them into a single PDF document where each image becomes a separate page. Think of it like creating a digital photo album or a scanned document collection.
Inserting Images into Existing PDFs
This involves opening a PDF that already has text or other content and adding new images to specific pages—like inserting a logo into a report or adding a signature to a contract.
For most people, the first scenario is what they actually need. You've got photos, screenshots, or scanned documents, and you want them bundled together in one neat, shareable file that looks professional on any device.
The beauty of PDFs is that they preserve formatting, maintain quality, and can be opened on virtually any device without needing the original software that created them. That's why they're the gold standard for sharing documents professionally.
Why Add Images to a PDF?
Great question. Why not just send the images individually? Well, here's where things get interesting:
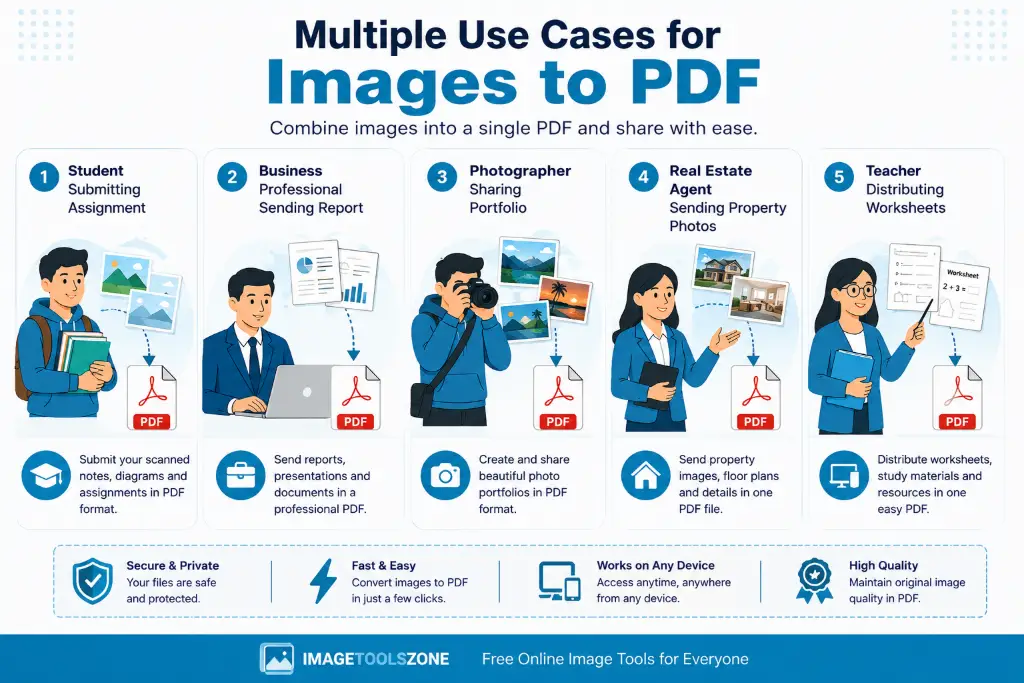
Real-World Scenarios Where PDFs Shine
- School Assignments: Teachers often require PDFs because they're easier to grade, can't be accidentally edited, and maintain formatting across different devices.
- Business Reports: Need to send monthly analytics with charts and graphs? A PDF keeps everything looking crisp and professional.
- Invoices and Receipts: Combine multiple transaction screenshots or scanned receipts into one organized document for expense reports.
- Product Catalogs: Small businesses can create stunning catalogs by converting product photos into a browsable PDF.
- Photo Albums: Planning a family reunion or wedding? Turn your best shots into a keepsake PDF album.
- Travel Documents: Keep boarding passes, hotel confirmations, and itinerary screenshots all in one place.
- Portfolios: Designers, photographers, and artists can showcase their work without worrying about image compression on social media.
- Legal Paperwork: Scanned IDs, signed contracts, and official documents are almost always required in PDF format.
The bottom line? PDFs are universal, professional, and practical. They're the Swiss Army knife of document sharing.
How to Add Images to a PDF Online Free (Step-by-Step Guide)
Ready to convert your images? Here's the simplest method that works every single time. We'll use our free online tool as an example, but the process is similar across most platforms.
Upload Your Images
Head over to the image to PDF converter and click the upload button. You can drag and drop files directly or browse your device. Most tools let you select multiple images at once—hold Ctrl (or Cmd on Mac) while clicking to select several files. Supported formats typically include JPG, PNG, WebP, BMP, and more.
Rearrange Pages (If Needed)
Once uploaded, you'll see thumbnails of all your images. This is where the magic happens. Simply drag and drop to reorder them. Want your sunset photo first instead of last? Just drag it to the front. This visual interface makes organizing a breeze, especially when you're working with dozens of images.
Rotate and Adjust
Did you take a photo in portrait mode that's showing up sideways? No problem. Most tools offer one-click rotation. You can also adjust orientation settings to ensure all pages are consistently portrait or landscape, depending on your needs.
Choose Page Size and Quality
Here's where you customize your PDF. Select your page size (Letter, A4, Legal, or custom dimensions). If you're concerned about file size, you can adjust compression settings. For high-quality prints, choose maximum quality. For email sharing, medium compression works great.
Convert and Download
Hit that convert button and watch the magic happen. Within seconds (or minutes for large batches), your PDF will be ready. Click download, and you're done! The file saves directly to your device, ready to share, print, or store.
Ready to Try It Yourself?
Visit our free PDF converter tool and create your first PDF in under 60 seconds.
Benefits of Creating PDFs from Images
Why should you bother converting images to PDFs instead of just sending the original files? Let's break it down:
No Software Installation
Forget downloading bulky software that eats up storage space. Online tools work directly in your browser—Chrome, Firefox, Safari, Edge, you name it. They're cloud-based, so they work on Windows, Mac, Linux, Chromebooks, even your phone.
Lightning Fast
Modern conversion tools process images in seconds. We're talking about converting 20 high-resolution photos in less time than it takes to make coffee. Batch processing means you can handle hundreds of images without breaking a sweat.
Secure Processing
Reputable online tools use SSL encryption and automatically delete your files after processing. Your sensitive documents never sit on servers collecting digital dust. They're processed, downloaded, and permanently removed.
Universal Compatibility
PDFs are the universal language of documents. Whether your recipient uses an iPhone, Android, Windows PC, or Mac, they can open your PDF without needing special software. Adobe Reader is free, and most devices have built-in PDF viewers.
Professional Presentation
There's something inherently more professional about a well-organized PDF versus a folder full of random image files. It shows you've put thought into presentation, making you look polished and detail-oriented.
Better Organization
One file is easier to manage than fifty. Email attachments have limits, cloud storage counts individual files, and let's be honest—nobody wants to download 30 separate images. A single PDF solves all these headaches.
Supported Image Formats
One of the best things about modern PDF converters is their flexibility. You're not limited to just one type of image file. Here's what you can typically work with:
| Format | Best For | Quality | File Size |
|---|---|---|---|
| JPG/JPEG | Photographs, screenshots | High (with some compression) | Small to Medium |
| PNG | Graphics with transparency, logos | Lossless (perfect quality) | Medium to Large |
| WebP | Modern web images | Excellent | Very Small |
| BMP | High-quality images | Uncompressed | Very Large |
| GIF | Simple graphics, animations | Limited (256 colors) | Small |
| TIFF | Professional printing | Maximum quality | Very Large |
| HEIC | iPhone photos | High efficiency | Small |
💡 Pro Tip:
If you're mixing formats in one PDF, the converter will automatically handle the conversion. You don't need to standardize everything beforehand—just upload and go!
Common Mistakes to Avoid
Look, we've all made these mistakes. But now that you know better, you can do better. Here are the pitfalls that trip people up:
❌ Uploading Blurry Images
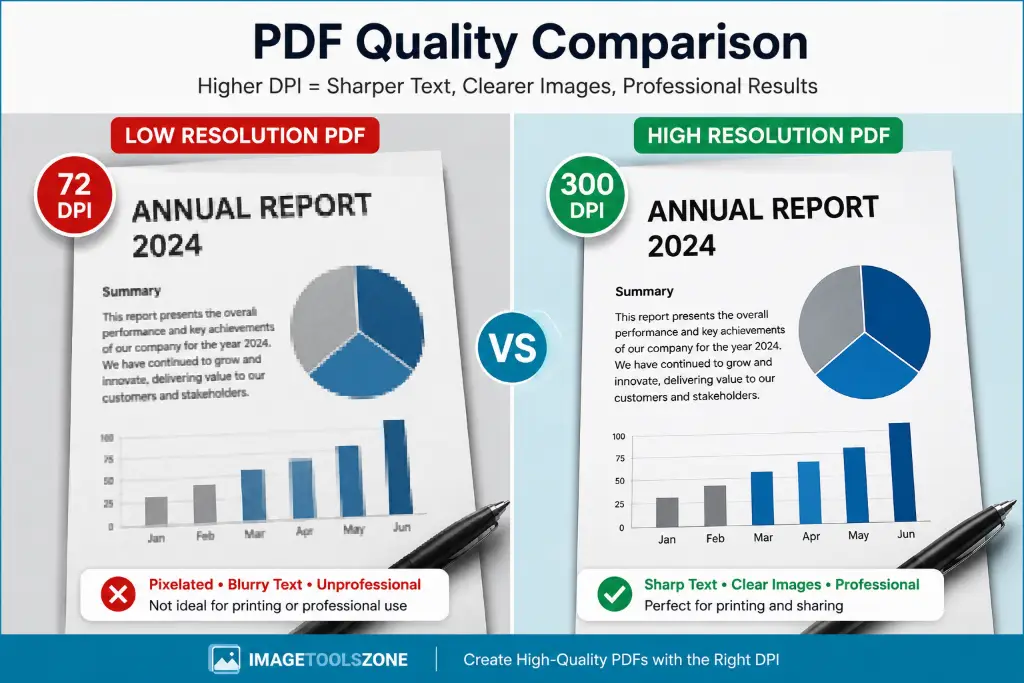
A PDF won't magically improve image quality. If your source images are pixelated or blurry, your PDF will be too. Always start with the highest resolution images available. If you're scanning documents, use at least 300 DPI for clear, readable text.
❌ Ignoring Page Order
Nothing screams "amateur" like a PDF where page 5 comes before page 2. Always review your image sequence before converting. Most tools show thumbnails—take 30 seconds to drag them into the right order.
❌ Creating Massive Files
Sending a 50MB PDF via email? That's a one-way ticket to the spam folder. If your PDF is huge, use compression tools. You can reduce file size by 70-80% without noticeable quality loss. Check out image compression tools before converting if needed.
Mixing Orientations
Half portrait, half landscape? That's jarring for readers. Stick to one orientation throughout your document unless there's a specific reason to mix them. Consistency looks professional.
❌ Forgetting to Crop
White borders, unwanted backgrounds, random objects in the frame—crop your images before converting. Clean, focused images make for cleaner PDFs. Use online cropping tools to perfect each image first.
❌ Skipping the Preview
Always, always preview your PDF before sending it. Check that all images loaded correctly, text is readable, and pages are in order. A 10-second preview can save you from embarrassing mistakes.
Best Ways to Organize Images Before Converting to PDF
Preparation is everything. Spend a few minutes organizing your images before you start, and you'll save yourself tons of time (and frustration). Here's how to do it right:
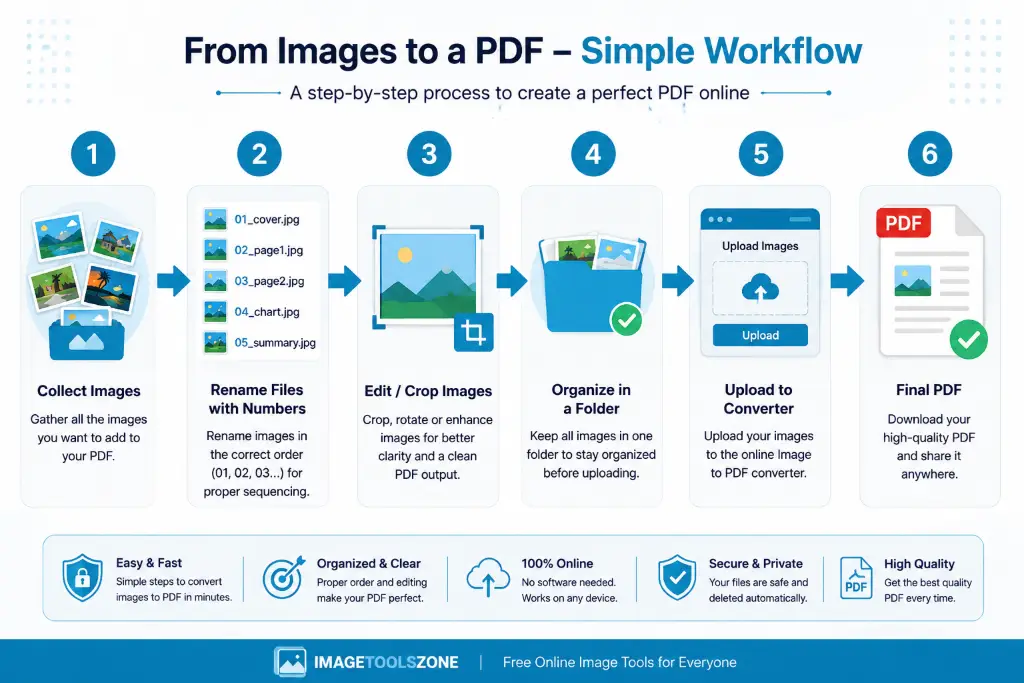
1. Use Descriptive File Names
Instead of IMG_4523.jpg, rename it to 01-introduction.jpg, 02-product-photo.jpg, etc. Number your files in the order you want them to appear. Most converters will automatically sort by filename, so this does the organizing for you.
2. Create a Dedicated Folder
Don't hunt through your Downloads folder or Desktop chaos. Create a new folder specifically for this PDF project. Dump all your images there, organize them, and upload the entire folder at once if the tool allows it.
3. Standardize Image Sizes
If you want a polished look, make sure all images have similar dimensions. You don't need them to be identical, but wildly different sizes can look unprofessional. Use image resizing tools to create consistency.
4. Edit Before Converting
Need to adjust brightness, add filters, or remove backgrounds? Do it before creating the PDF. Tools like background removers and online photo editors can help you polish images first.
5. Check Image Orientation
Rotate all images to the correct orientation before uploading. While converters let you rotate during the process, it's faster to fix everything upfront. This is especially important for scanned documents that might be sideways or upside-down.
How to Reduce PDF File Size Without Losing Image Quality
Here's the eternal struggle: you want your PDF to look amazing, but you also need it to be small enough to email or upload. Good news—you can have both. Here's how:
Compress Before Converting
The smartest move is to compress your images before turning them into a PDF. Modern compression algorithms are incredibly sophisticated. You can shrink a 5MB image to 500KB with virtually no visible difference. Try online image compressors that let you preview quality before downloading.
Choose the Right Resolution
Not every PDF needs 300 DPI resolution. If you're sharing on screen only, 150 DPI is plenty. Save the high resolution for print-ready documents. This simple choice can cut file size in half.
Convert to Grayscale When Possible
Color images are larger than black-and-white ones. If you're scanning text documents or don't need color, convert to grayscale first. Use color to black and white converters to reduce file size significantly.
Use PDF Compression Tools
Already created your PDF but it's too big? No worries. Many online tools offer PDF compression as a separate feature. They'll optimize the entire document, compressing images intelligently while maintaining readability.
⚠️ Watch Out:
Over-compression is real. If you compress too aggressively, text becomes unreadable and images turn into pixelated messes. Always preview after compressing, and keep an original copy just in case.
How to Combine Multiple Photos into One PDF
Sometimes you don't want each image on its own page. Maybe you're creating a contact sheet, a comparison guide, or a collage-style document. Here's how to fit multiple photos on a single PDF page:
Method 1: Use a Collage Maker First
Create a collage using online image merger tools, then convert that single collage image to PDF. This gives you complete control over layout, spacing, and arrangement.
Method 2: Choose "Multiple Images Per Page"
Some advanced PDF converters offer this option directly. You can select 2, 4, 6, or even 9 images per page. The tool automatically arranges them in a grid. Perfect for contact sheets or thumbnail galleries.
Method 3: Create a Template
Design a template in a tool like Canva or Google Docs with placeholders for your images. Insert your photos, then export the whole thing as a PDF. This method gives you the most creative freedom.
Best Practices for Multi-Image Pages
- Leave adequate white space between images—don't crowd them
- Keep images similar in size for a clean look
- Add captions or labels if needed for context
- Use consistent spacing and alignment
- Consider adding borders or shadows to separate images visually
How to Convert JPG, PNG, and WebP Images into PDF
The process is nearly identical regardless of format, but there are some format-specific considerations to keep in mind:
JPG to PDF
JPGs are the most common format, and they convert beautifully to PDF. The only caveat: JPG uses lossy compression, so if you're converting a low-quality JPG to PDF, you can't magically restore quality. Start with the best JPG you have.
PNG to PDF
PNGs support transparency, which is great for logos and graphics. When converting PNGs to PDF, the transparent areas typically become white backgrounds. If you need to preserve transparency, make sure your PDF viewer supports it (most modern ones do).
WebP to PDF
WebP is the new kid on the block—Google's modern image format that offers superior compression. Not all PDF converters support WebP yet, but the good ones do. If your tool doesn't support it, convert WebP to JPG or PNG first using format conversion tools.
Mixed Formats
Got a folder with JPGs, PNGs, and WebP files all mixed together? No problem. Modern converters handle mixed formats seamlessly. They'll convert everything to PDF format internally, so the final document is consistent regardless of source formats.
Best Uses for Image-to-PDF Conversion
Let's get specific about who benefits most from this technology and how they're using it:
Students
Submitting assignments, creating study guides from textbook screenshots, compiling research materials, turning handwritten notes into shareable documents.
Teachers
Creating worksheets, compiling student work samples, distributing reading materials, making answer keys, sharing classroom resources with parents.
Office Workers
Preparing reports with charts, creating presentations from screenshots, archiving email attachments, compiling meeting notes with visual aids.
Freelancers & Designers
Building portfolios, sending mockups to clients, creating style guides, documenting design processes, submitting invoices with work samples.
Photographers
Delivering client galleries, creating lookbooks, submitting to publications, making proof sheets, archiving work for contests.
Real Estate Agents
Creating property brochures, compiling listing photos, making comparison sheets for buyers, documenting property conditions.
Small Businesses
Building product catalogs, creating price lists, making instruction manuals, compiling customer testimonials with photos.
When to Use PDF Instead of Individual Images
This is a judgment call, but here's a simple decision tree to help you decide:
Use PDF When:
- You have 3+ images that belong together
- The recipient needs to print the document
- You want to maintain specific layout or formatting
- The images tell a story or show a sequence
- You're submitting to a formal process (job application, academic submission, legal filing)
- You want to prevent accidental editing
- File organization matters (one file vs. many)
Stick with Individual Images When:
- Each image needs to be edited separately
- You're posting to social media (platforms prefer individual images)
- The recipient specifically requested separate files
- You only have 1-2 images total
- File size is critical and compression would hurt quality too much
When in doubt, ask the recipient what they prefer. But 9 times out of 10, a well-organized PDF is the more professional choice.
How to Print High-Quality PDFs Created from Images
Creating a PDF is one thing; printing it beautifully is another. Follow these tips to ensure your printed PDF looks as good on paper as it does on screen:
Start with High-Resolution Images
For print, you need at least 300 DPI (dots per inch). If your source images are 72 DPI (typical for web), they'll look pixelated when printed. Use image enhancement tools to upscale if needed, though nothing beats starting with high-res originals.
Choose the Right Page Size
Match your PDF page size to your paper size. In the US, that's usually Letter (8.5" x 11"). In most other countries, it's A4 (210mm x 297mm). Mismatched sizes lead to awkward scaling and wasted paper.
Set Print Quality to Maximum
When printing, don't use "Draft" or "Economy" mode. Select "High Quality" or "Best" in your printer settings. Yes, it uses more ink and takes longer, but the difference is night and day.
Use the Right Paper
For photos, use glossy or semi-gloss photo paper. For documents, use bright white 24lb or 28lb paper. Cheap, yellowish paper makes even the best PDF look amateur.
Check Color Settings
Make sure your printer isn't set to grayscale if you want color. Conversely, if you're printing text documents, grayscale saves money and often looks sharper.
Preview Before Printing
Always use Print Preview. Check that margins look right, images aren't cut off, and everything fits on the page the way you expect. One sheet of test print can save you from wasting 20 sheets.
Frequently Asked Questions
Ready to Create Your First PDF?
Stop juggling dozens of image files. Start creating professional, polished PDFs in seconds.
Try It Free Now →No registration required • No watermarks • 100% free
Final Thoughts
Look, we've covered a lot of ground here. From the basics of what it means to add images to a PDF, to advanced tips on compression, organization, and printing. But if you take away just one thing, let it be this:
Creating PDFs from images doesn't have to be complicated.
You don't need expensive software. You don't need a computer science degree. You don't even need to leave your browser. With the right online tools—like the ones we've discussed throughout this guide—you can transform your scattered images into professional documents in less time than it takes to read this sentence.
Whether you're a student rushing to submit an assignment, a photographer delivering a client gallery, a small business owner creating a product catalog, or just someone who wants to organize their vacation photos, PDFs are your friend.
So go ahead. Give it a try. Upload those images. Hit convert. And watch as chaos transforms into order, one PDF at a time.
Quick Recap:
How to add images to a PDF online free: Upload → Arrange → Adjust → Convert → Download. That's it. Five simple steps to PDF perfection.
Happy converting!